Thursday, December 29, 2011

What to do with border print.

An impulse buy, this border print fabric. When I put my hand on it I could see the midi length skirt with a waistband and small waistline gathers, part of a Talbot's ensemble offered up around the holidays sometime back in 1985. I thought then I'd no doubt do the same thing just because those kind of outfits are serviceable. Then I forgot about needing a holiday outfit and the fabric marinated for a year. I pulled it out this fall and was playing with it when this solution fell out and I went with it.
The fabric has lycra and stretches, it's velvet-like but the other side is a smooth knit.
This is the first thing I made with my new Sure Fit designs kit. The fit is great but I should have made the waist smaller because it stretches a tad too much.
I pieced the border to one side front. I like it.
From the back.

Wednesday, November 30, 2011

New Sewing

Back before school started, we went shopping for clothes for the 7th grader. The feet are now man-sized and those skinny jeans purchased in December could not even be pulled up all the way. On the way out we spied a nice jacket, perfect for the soon to be cooler mornings. It had a superabundance of pockets, a zippered front. Nice; but $50. bucks___ and made of some pedestrian broadcloth. I piped up with the words that have undone dressmakers since the flood: 'I can make that!' (for you newbies).

I knew I had a piece of a fairly sturdy denim-like dobby weave in a inky navy that had been aging in the larder since the days of Natural Fiber Fabric Club. I showed it to him. "That's nice." he said. I sketched all the pockets it could have. Pockets on the shoulders? "OK!", he said. One shoulder or both shoulders? "Both". I was off. I knew not to show him the Lutterloh schematic I was using for a kid's jacket, those drawings are from the 1980's and would have probably been scorned by 12 year olds of the time.

Sewing was very straightforward. I didn't need to make any adjustments to the pattern except for the desired length, the child is basically a pole with shoulders. I may have made the sleeves a mite longer to anticipate growth. There was however, putting in six pockets, two bound buttonhole pockets, two chest pockets with flaps and two shoulder pockets with flaps. There was the trip to find a separating zipper and the specific care to be sure the flap opened up on the … which is it? right or left side?… the other side anyway.

All the while the weather did get cooler and I wanted needed to get on to a similar duty jacket for myself. I'd looked at the one I'd had, a copy of a barn jacket in a mustardy color with plum velveteen collar, and sent it off to Goodwill. I may have had it 20 years. While I sewed on those pockets, and tried to work out some topstitching scheme, I wanted to figure out what to wear that wasn't a heavy sweater or overcoat.

I finished the little jacket in time for Maker Faire, a bright, crisp morning. We were all excited to go, but when the moment came, the 7th grader refused to put the jacket on. Not only was it unsatisfactory to wear to Maker Faire, it didn't pass muster for 7th grade either. I was---- what's the word? oh yeah--  crushed.

After awhile, my head cleared and I just decided this was the inevitable moment. While he appears oblivious to "fashion" and we have been spared any yearning for expensive sneakers and label heavy vines, he does not care to be seen about in something his Mama made. The Dad was privy to the reason for the rejection however. Apparently, the color was "too dark", and the jacket had a quality… too… neat? Whatever, it seemed like something a g--l might wear. Kiss o' death. And why weren't these opinions expressed early when the Mama asked for them? He said he didn't want to break my heart.        awwwwww. 
Well, that's about right for a 7th grader as far as judging foreseeable outcomes goes, no?

So it's months later and we're actually in the store on the Black Friday after a movie. It was calm in the store we were at and we were on a mission for necessary unmentionables, which can't be put off. While waiting on line I sent the child over to check out a 50% off rack for anything he might fancy. He came back with another little jacket, pocketed to a fare-thee-well, zipper down the front, of possibly less substantial fabric than the first one, now marked down to $25. Let me say__ had it been marked at that price from the beginning I'd have bought it, because it wasn't worth a cent more than that, even allowing for a reasonable markup.  I looked at it in his hand while the boy read my mind out loud. I told him to get it if he wanted it, whereupon he put it back, came home and put on the jacket I made for him.


Thursday, August 4, 2011

Summer Dress-a-thon Continues

1. Housedressy

This is a test of a shoulder princess line draft from my sloper. I'm hoping to squeeze a denim, sleeveless, shirtdress out of it, if I have enough fabric. It's constructed entirely on the machine, the seam allowances and hem are pinked and stitched down. Sewn on placket for the buttonholes, narrow collar band. It is comfy, fulfilling it's housedress mandate admirably.

This pattern and the cherry sprigged cotton pique have been languishing in the larder at least a decade. Long enough for me to learn how to adapt a commercial pattern to fit me; with 'fitting me' being a moving target, steadily creeping toward the baroque. At first this was put aside so I could find the perfect, red and cream colored print to make the facing, collar, sleeve bands and tie belt contrast with the dress fabric. Every spring I remembered I wanted to make it, even after I found a contrast print I liked. But as time marched on, the idea of a retro tribute soured. What would be cute on a younger person, made me half afraid someone might ask me to bring them clean towels when I had a chance and I'd end up in jail. I decided a little red rick-rack was as far as I ought to go.
I like it, still accessory challenged, witness my shame at having only that black web belt with the army-navy store buckle to model it in. The cotton pique is soft but kind of thick and heavy. I'm doubtful this will be so comfortable in a heat wave. No additional expenditures were made. Even the buttons were in the stash, a gift from my friend Madeline who does not fear the flea market.


Sunday, July 10, 2011

Summer Dress (es?)


This linen was destined for a long sleeved shirt.
So much of sewing intention is shaped around the climate. New York summers have been such that they can be recalled with dread in January. It didn't take much to can that long sleeved plan and go for a simple sheath. I had 2 yards, the fabric was about 50" wide, lets go.

I didn't have success with the simple sheath pattern I fell for last summer. Butterick4386 showed me all sorts of ideas and promised to turn into my very own TNT pattern. But I did not like the way that puppy looked made up and on me, even after I added an iron on monarch butterfly to it.
I learned something though. The boat neck isn't my best friend. I need to shorten the upper chest area and maybe between underarm and waist as well because the dress didn't hit where the remains of my waistline is… or isn't. That's progress though.

This time around I used my sloper to draft the pattern. I raised the armhole for the grater coverage needed for a sleeveless dress. I also dug out a THREADS article "Curved Darts Flatter Every Figure" (issue# 107). I re-shaped the bodice darts, making them s- curved. I didn't even shape them as much as I could have and still got better results. This technique is a keeper. I kept the big pockets they're hard to see with the print, though.
The construction was eccentric because I relied on my experience putting things together. I also approached the dress like a drawing, without knowing where it would end up, I made decisions as I went along. Read: I didn't figure out how to put this together beforehand and some procedures cancelled out procedures I might have used later, if I thought about it. I drafted facings for it, then thought I'd like to bind the neckline with some contrasts. That worked out well, I like that kind of fiddly work sometimes but then I had to stay stitch the armholes, clip and press the seam allowances to the inside and slip stitch the dress and facing armholes together, then sew up the side seams. A slit neck opening on a dress I saw somewhere caught my eye and I altered my facings to suit. Then I thought I might not be able to get into the dress after altering for the more close fitting darts. Back to THREADS magazine to check whether I could use a side zip closing. That would have required more forethought though, and I hadn't planned for deeper side seams. I read that 23" was the minimum neck opening length for pulling something over your head. I had more than enough. I turned out the button tin and found the green flower shaped button, started to make a spaghetti tube to use as a loop fastener, then remembered the "Cool Corder" tool I fell for at a long ago "Knit-Out" in Union Square. It took less than ten minutes to get the thing working and spit out a short length of i-cord for the loop. At the last minute, I added the purple button over the green button so the flower could have a center.
I want to keep going and make more summer dresses.

Thursday, June 30, 2011

Another Vintage Try

I chose this pattern to enter in the Vintage 2011 contest because it calls for twelve bound buttonholes and part of the challenge asked for tackling some "vintage" technique. As with the previous vintage pattern, I was doubtful I'd be able to end up with a dress in which I could echo the smart, carefree vibrance of the girls on the envelope. But I'm watching my comrades on Pattern Review successfully make garments of all kinds so I forged ahead. I have a huge beef with fashion illustration.

As before I used my sloper to adjust the pattern. I could see on the envelope that lady was about 5'10", I folded out length in the bodice and skirt. No muslin this time, I pinned my Frankenpattern to Looshilala, my dress form and everything seemed OK, but Looshi has no arms. Apparently Miss Lady on the pattern envelope has really skinny, 2D arms because I found the cut on sleeves too small. I added a gusset: I cut it on the bias, adding about 2", now it's comfortable.

This Butterick dress didn't call for the skirt lining and waist stay as the Vogue dress did so I added a lining and made a self fabric belt to keep it at the waistline. Found the belting material at Steinlauf & Stoller (thank goodness they're still in business) and a tiny buckle that went with buttons already in stash was sitting right in B&J Trimming, waiting for me.

I'm fairly pleased with how it turned out, I liked making the buttonholes, using the Bunka "Fundamentals of Fashin Design" instructions. They all came out well except I made every last one of them on the "wrong" side. I also made the bow, as seen on the envelope, from this nice cotton fabric. I forgot to pin it on though since I had to move quickly while my little photographer was sanguine about the project.

Vintage Pattern 2011


OK, I'm done. I think it is as I suspected, I do not have enough imagination to pull off these vintage patterns. This is the Vogue pattern from the last post. It turned into a comfortable dress after I adjusted it along the lines of my sloper.


I made a muslin first:
That came out OK. Then I decided to use this fabric I've had in the larder since Hector was a pup…( you'll date yourself if you know that expression).

And it was this choice that allowed me to so completely channel my Nana. Let's hear it now,__ a big, resounding, MEH!!!! And that is just fine with me. There needs be occasions where fading into the background is just what you want. I am so ready now.

I have faced the fact that I am accessory challenged. This dress needs a belt. I finished it a month ago and started another contest entry for which I made a belt, but I didn't have enough scraps left to make one for this dress and I couldn't bring myself to shop for no belt; in fact, I'm wearing a belt I bought in March when I broke down and bought 2 pairs of jeans. Since my brain loses the signal in a department store, I bought this "reversible" belt, thinking I'd be getting two belts in one__no. I got a plastic belt that sits still only when folded one way; I should have chosen which color (black or brown) I wanted and stuck with it. Someone who understands "accessorization" would not have made this clown-town mistake.

Accessory deprivation extends to the "foundations" department as well, if you catch my drift. I'd have to be demented to climb into a girdle to wear this dress, but maybe a dressier fabric might provide the motivation. This pattern has some mildly interesting details : the bust darts are routed around to a center front seam. I elected to make the more visible plaid match rather than get the seams dead on so there is a tiny jog there. The skirt darts are positioned like an upside-down V; probably more noticeable in a solid color.

All in all it was an easy pattern to make. Since I was using my sloper to fit the pattern I was grateful for its simplicity.The skirt part is lined, it has a side zip and waist stay. The instructions have you stitch that to the bodice seam allowance but the waistline seam was larger so I just tacked the stay to the seam allowance. The stay keeps the dress sitting at the waistline.
I guess this is an everyday dress for the time.

Friday, May 6, 2011

Contest Drop Out Tries Again

So I crashed and burned on the Mini wardrobe SWAP. I finished 3 out of 4 items but not in time. But why let that stop me from entering the Vintage Pattern contest on Pattern Review?

I found this pattern on Lanetz Living, it wasn't as expensive as I thought it would be. Prices for these old patterns are all over the map it seems.

Now let me say up front, even though I'm an illustrator, these pattern illustrations give me pause. I know it's a "fashion" illustration but I look at it and can only see how not like the drawing I am. Is that skirt going to be as narrow as it appears? Will I have trouble walking or sitting down? These girls must mince along on those skinny legs, taking teeny tiny steps and going nowhere fast. In my mind, I bound along like one of R. Crumb's women… at least in my mind and in comparison to these ladies. So there's that.

What encouraged me to enter the contest though, was the certain necessity of having to alter the pattern to fit. We're supposed to follow techniques outlined in the pattern instructions. This pattern doesn't have any really baroque construction details beyond sew in interfacing. Another requirement is to use a pattern with the "old sizing", whatever that is. Generally, I think that means smaller.

I used Linda Maynard's "De-Mystifying Fit" CD to help with alterations. I adjusted the pattern to fit my personal sloper. The old patterns have the advantage of being printed in one size, with the seam line marked.
I was relieved to see, when it arrived, the pattern I picked was pretty basic. It has a side zip, I haven't done that before, and the bust dart has been rotated to the center front.

For the first time, I made a muslin, using an old sheet. I also sketched the design on my croquis. I was not reassured by the pattern envelope that this would work for me. I compared and adjusted first the length measurements and then the circumferences of the pattern to my sloper. I changed the shoulder slope, mine are more square (this girl never carried anything heavier than her purse). I reshaped the hip curve and took length out of the skirt.

The muslin made up, since I used a white sheet, it looked a lot like my croquis drawing. I compared the fit with the apparent fit in the drawing and saw I could add some length to the bodice to achieve the blouson effect and remove some of the ease from the sleeve cap. I shortened the skirt considerably, after that there wasn't too much to do. Could it be female physiology is much the same as it was in 1961?

I wonder.

More, later.

Impulse Sewing

I caught a vapor and made this skirt. The fabric is some wild stuff that probably went for drapes at a museum or hotel. It is just that outsized, crewel wool embroidery on what seems to be a loosely woven cotton. It has been in the stash sediment for perhaps 12 years. I never knew what to do with it, didn't have that much to work with, yet I couldn't throw it out. The story of the fabric addict. Anyway, when the vapor hit, I knew. Skirt. Have been thinking of outré skirts lately and hope to explore more along this vein. This is my first go at it.
I used my skirt sloper, overlapping the side seams of front and back pattern. There's only a back seam and I lined that up with the selvage. I put in an invisible zip. Because the embroidered parts are so very dense in places, I made all the fitting darts wherever I could. They are not centered, some are squeezed together, of all different sizes, I flew fast in the face of whatever the books tell you to do. It took me back to my sewing for Barbie days, when we wrapped the cloth around our Barbies, cut away what we didn't want, took it off and sewed it up. Such a liberating experience!
There's a name for that… what IS it?
Why'd I go there?
Because I knew that if anyone looks at this skirt at all, they are only going to see these gargantuan flowers.
The fabric has to be some home dec stuff because the crewel embroidery is quite scratchy. Drapes don't get a lot of rubbing I guess. I lined this, putting the lining together in the usual way, side seams balances darts. I used another, plaid home dec scrap to make the narrow waistband (thank you Margaret!). It's green.
If I made this again I'd take it up more to fit the waist. I tried it on Looshilala, bless her, because I hate trying on anything, but this didn't take account of the squeeze effect of pantyhose.

Cost: $0.ºº, the fabric was practically a dumpster dive, another reason to be totally cavalier with the project. ¡Bwahaha-haha!

Saturday, March 19, 2011

Mini Wardrobe


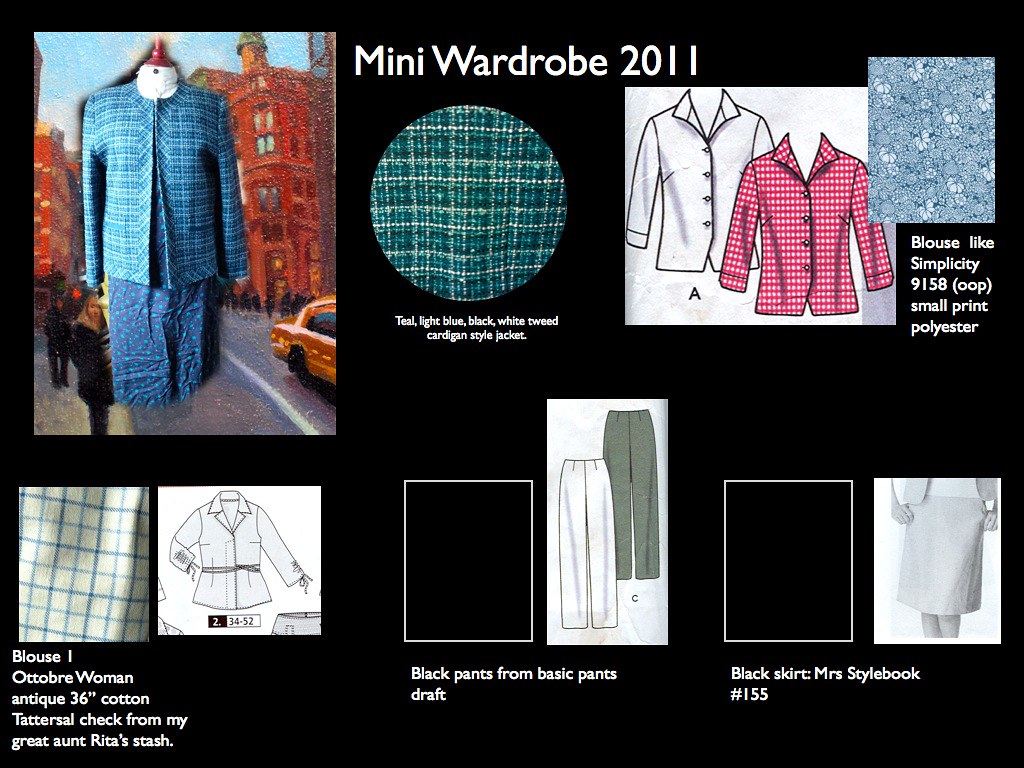
So I started with this blouse from Ottobre Woman 5/2007. I like this issue a lot.
Having made Ottobre tops before, I've come up hard against the truth: they are drafted for a taller woman than I am. It says so right in the magazine: she is 5ft. 6in give or take. I'm 5ft.4in. I used my recently re-done sloper to figure out where the differences were with a simple pattern.


The personal sloper lines are shown in black. The two places I lined up the patterns are the neck/shoulder point and the waistline. The distance between the shoulder and underarms are far apart. It was the same with the back pattern piece. I began to see what made the previous garments so uncomfortable once they were made up… after I'd checked the circumferences and matched them up. As drafted, this extra length in the upper chest made the blouses restrict arm movement. The collar bands and collars were also strangely too long! It was frustrating.


You can see the difference in the Ottobre sleeve outline (Orange) and the sleeve cap I drafted from the front and back sloper armholes as is done in the Mrs. Stylebook pattern magazines. After this step, I slashed the sleeve up the middle and spread it to give me 2in. more room in the bicep.

You can see the blouse on me at Pattern Review Back to the sewing machine.

Mini Wardrobe

I've been vicariously sewing through the blogs because too busy with work (a good thing!)
Another blogger's plan to coordinate with an orange jacket reminded me of this jacket, the top part of a suit that came with black pants. I wore the pants out so I'll be replacing them and making a skirt both black.
I'll make two blouses and be done with it, three pieces of fabric used and now I can use this jacket. All fabrics from the stash but don't think I didn't get online and …almost…click…that…button!

Sunday, January 23, 2011

Sweater Spin 2011

Don't know what possessed me but I joined a new Ravelry group, well that's probably not true, I do know what possessed me. Because while I've been working, dog-like, there is very little time to indulge any of my fiberly pursuits, I signed up for Sweater-Spin 2011. This gave me something to think about. In no time, my mind was turning it over like all of the other assignments I have going. I had some Blue Faced Leicester languishing in here, plain white, un-dyed. It took a few weeks to settle on a color scheme, and I spent awhile pouring over pattern possibilities. For this sweater, I'd considered some dark jewel toned colors at first but noting that a few group members were challenging themselves to produce two sweaters, I got the idea that the first sweater should feature SPRING colors since it ought to be done by then and no winter month is colder than April in my opinion. I'm not even sure whether two sweaters are not a requirement of the challenge but if they are, the second sweater in the dark palette ought to debut at the end of the year.
So I dyed my fiber: lime green, blue, orange and red-violet. According to Deb Menz (Color Works: the Crafter's Guide to Color) this is a square tetrad, another way of saying two sets of complementary colors: lime & red-violet, blue & orange. Now when it comes to spinning, I am not so smart I can do any more than spin this up randomly but I did divide the 16 oz. of top into roughly four chunks and then dyed each chunk so that about half a given piece was left a pale shade or white. I got exactly what I expected and figured the yarn would have to spin up in the mid to light range, what I was looking for.

For the design of the sweater itself, my first thought is a simple v-neck with bracelet length sleeves so I can wash my hands without getting my sleeves wet. I'm trying to spin a sport weight yarn because I haven't much use for a big heavy sweater and can't get one under my winter coat. There are plans for a less effective winter coat that will require a sweater underneath--- (which seems nutty even to me) but the winter coat I have now is too warm to put more than one layer underneath it. I am grateful for that puppy this winter, I hear tomorrow it will be 18°F here in New York.
Here's how the yarn is coming out so far. It's awfully like the last yarn I dyed and spun but I'm not bothered. That sweater didn't look so hot on me so I gave it to my son. My latest notion is to use short rows in this simple v-neck silhouette to get some interesting stripe action out of this yarn. We'll see.

Monday, January 10, 2011


Dead of winter feels like time for a funny hat. I went for "Vortex" with extreme an point. The boy took one look at it, laughed and was eager when I suggested this pattern instead. I finished it, he put it on and wore it the entire day and then to bed at night. I learned today though that he has no intention of wearing it to school unless I devise the kind of buckled strap for it used to cinch cargo onto a semi's flat bed. That's grade school jargon for "never." He has not forgotten the Pre-K incident, where a little ruffian snatched the hat his mama made off his head and played keep-away with it.


It was fun to knit and very easy, essentially being a straight sided sack. the fins are added at the end. I didn't like the instructions for knitting the tail. Following them, it didn't seem the tail was coming out like the tails shown with the instructions. I'm helped when I think of knitting as drawing so I made up my own (double thick) tail from what I though the tail in the pictures was doing. The fins are k1p1 rib. By the time you get to this point in the pattern you realize stitch counts and what all don't mean a thing. I made the dorsal fin longer and used short rows to make it taller toward the front. The eyes are made from that fake chamois stuff for mopping up spills. I offered eyes dead or eyes alive, he chose dead. Great, four minutes at the sewing machine. I used bits of Brown Sheep lambs pride worsted as well as my own hand-spun wool.